
How to add menu items in Shopify store step by step Process?
How to add menu items in Shopify Store?
The navigation of your online store can be significantly improved by using menus. Your menu can link to any landing page on your website, including blog posts, product pages, or information about how to get in touch with you.
Regarding your website’s navigation, your users’ experience is an essential factor that should always be noticed. Something doesn’t need to remain on your menu indefinitely simply because you decided to include it in today’s menu iteration. You may remove or modify some of the options on your menu at some point in the future.
How to add menu items in Shopify store stepy by step Process?
- Add Shopify Menu Items
- It’s a piece of cake to add new items to menus in Shopify online stores. It entails a total of five steps.
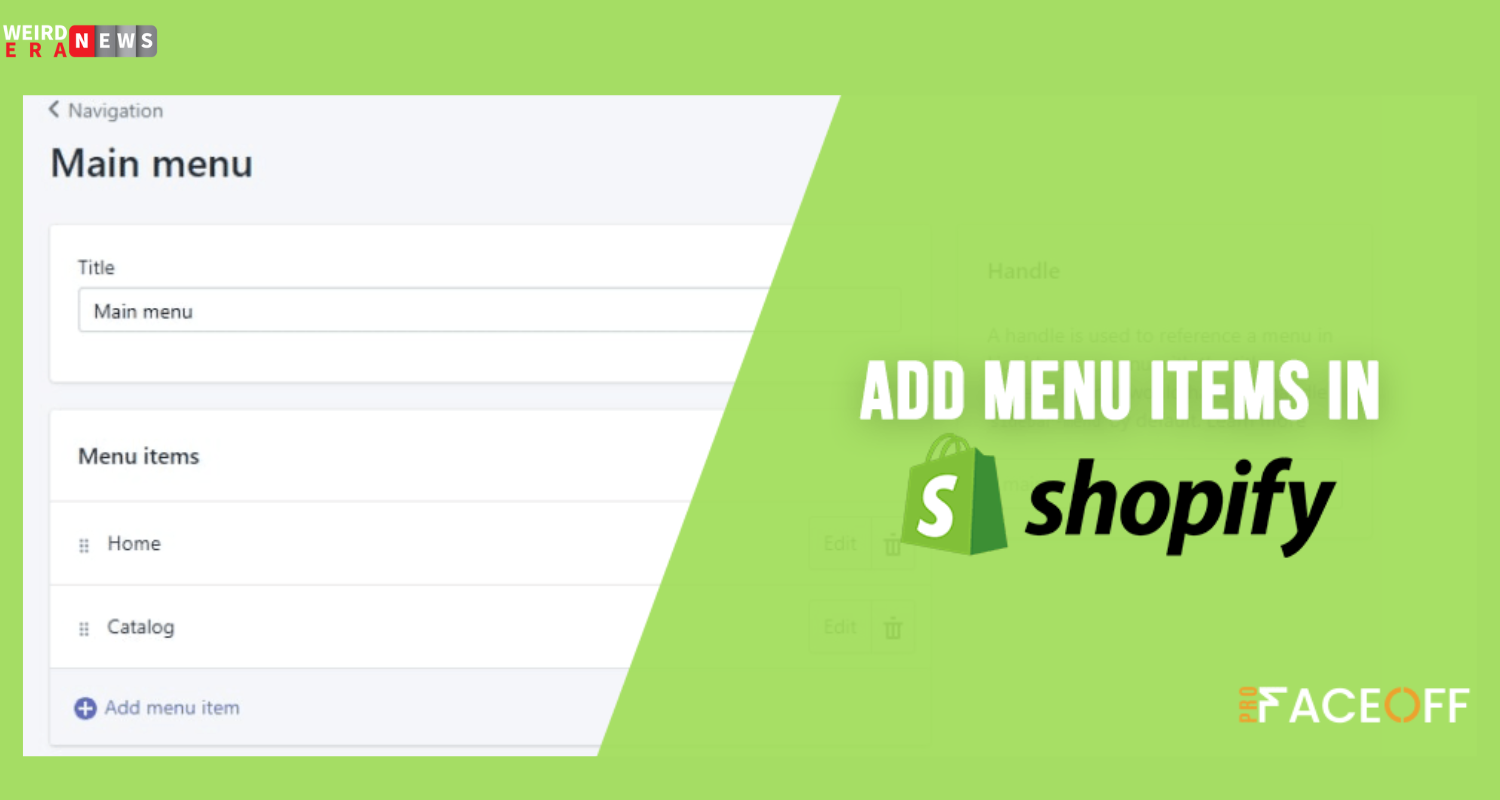
- After logging in to the Shopify admin dashboard, select Online Stores from the main menu and choose Navigation from the sub-menu. This brings up a list of the available menu titles.
- Select the item on the menu whose settings you want to change.
- To add a new menu item, select the Menu items section and click the + sign labeled Add menu item. The name and link field will appear in a popup that is displayed as a result of clicking this.
- Please enter the name of the item you would like to order. You are free to incorporate emojis and other special characters within it. After then, the menu will reflect this name as an option. Because of this, you need to give it an appropriate name.
- Enter the URL of an external website in the field labeled “Link,” or choose the appropriate link type for the item on your menu as follows:
- Your online store’s landing page is sometimes known as “Home.”
- Collections, either one particular group or all of the available collections products – either one specific product or all products in general Pages are equivalent to a standard web page on your Shopify store. Blogs, namely the blog for your online store Blog posts, sometimes referred to as a blog posts on your Shopify store Policies: one of the policies that govern your Shopify store.
- To save your menu item, click the Add button, then hit the Save menu button.
Shopify account Menu Important points
- In step 5, if you want to build a link to an email address, you should use the following email format: mailto:[email protected].
- You can use tags to filter the pool if you choose a specific collection or all collections. This will ensure that the only products displayed match all of the tags you have entered.
- When selecting a link, deciding on a particular destination is recommended first. For instance, when you choose Home, the goal will immediately change to the homepage of your online store.
You are now equipped with the knowledge necessary to add menu items in Shopify. Continue reading to learn how to update Shopify menu items, change the order in which they are shown, and delete them altogether.
Edit the Items on the Shopify account Menu
- Go to Online Store > Navigation in the Admin section of your Shopify account. To access the item, click the menu’s name in the drop-down list.
- In the section titled Menu items, click Edit next to the name of the thing you want to change.
- To modify the menu item’s name, enter the ” Name ” field and type in the new name.
- To modify where the menu item will take you, click the x in the Link field and type in or select a new location from the drop-down menu.
- After clicking the Apply changes button, go to the Save menu.
If you wish to rearrange the items displayed, you can do so by clicking and holding the handle icon () beside the menu item and then dragging it to the place you want it to be. Don’t forget to save your updated menu.
Get Rid Of Shopify Menu Items
In Shopify, removing menu items is just as straightforward as adding new things to the menu.
Using the Green Bag, you can get rid of your menu by removing it from the menu navigation. When you delete a menu item with items nested below it, all of the things nested below it will be deleted from your store navigation. This is something you should keep in mind.
All that is required of you is to:
- In the Admin Dashboard of your Shopify account, navigate to Online Store > Navigation.
- When you are ready to remove a menu item, look for the Delete button next to it.
- Click the Remove button to confirm, then select the Save menu option.
How to Quickly and Easily Add Shopify Menu Items
After reading this article, you should now be familiar with Shopify’s six straightforward procedures for adding shopify menu items. In addition, we have outlined the basic steps necessary to change and delete menu items from the navigation of your Shopify store.
It is vital to add menu items in Shopify to simplify the process of navigating and dramatically improve the quality of the user experience when using the site. You can get more information about How to add a drop-down menu in Shopify?
Utilize our how-to tutorials and immediately initiate the process of adding menu items to your Shopify store.
You might want to look at the nine best practices for customizing the Shopify checkout page if you’re concerned about the conversion rate of your Shopify store.
Take away one of the links from the Shopify Menu
To delete a link from a menu:
- Desktop
- iPhone
- Android
In the Admin section of your Shopify account, select Online Store, and after that, select Navigation (or press G W N).
Select the menu from which you wish to remove the link, and then click the Edit menu button next to that menu’s name.
In the section titled Menu items, click the icon that looks like a trash can next to the link you wish to delete.Shopify theme and do not call for any prior coding experience on your part.In this article, we will talk about setting up Local Pickup and Delivery in Shopify. How To Add A Pickup Option On Shopify?
Rearrange Shopify Menu connections
You can reorganize the links in your menu by using the handle tool, which allows you to change the order in which the links appear.
Editing a menu enables you to rearrange the links in the menu in whatever order you choose:
- Desktop
- iPhone
- Android
In the Admin section of your Shopify account, select Online Store, and after that, select Navigation (or press G W N).
Click the “Edit menu” button on the menu whose order you want to change.
A list of links can be found in the portion of the page titled Menu items. Your online store will display the links in the order that they appear in that list, which is the order in which they will appear on that list. You can drag a link into a new position by clicking and holding the handle icon that is located next to the link that you wish to reorder.
Click the Save menu.
5 Reasons to Create a Custom shopify Menu
User Experience: Regarding user experience, menus are essential for any modern website. This is because menus that are easy to use can improve a website’s discoverability and usability. Additionally, menus might be helpful during the onboarding part of the process.
On the other hand, search engine optimization (SEO) strategies can gain an advantage from well-designed menus, as menus play a significant role in the navigation of websites and establishing internal links. They simplify crawling, reduce the amount of money spent on crawling, increase click-through rates (CTRs), and reduce the number of steps consumers need to take to convert. (If you’re interested, you may read this article regarding the amount of work required by users of digital items.)
Conversion Optimization: Customers navigate your online store by clicking on links directly on the pages themselves or in the menus. Customize the menus and links in your store’s header, footer, and sidebar. You can make it simpler for customers to navigate the various sections of your establishment. They are unable to purchase anything that is out of their reach. Therefore, you require internal linking to complete the conversion.
It would be best to design custom menus like most other components in your Shopify store to build a better overall customer experience. There are a lot of chances for you to create your details, but you always have access to the default theme in its original form. Including custom components can be necessary if you want to adhere to specific branding requirements, or maybe it’s something you need to do as part of your linking strategy. It is always beneficial to have a working knowledge of how to modify a theme. Although we will be concentrating on menus for this lesson, the construction of your store will involve similar efforts for its many components.
To make your design responsive: The purpose of providing navigation menus on a website is to make it simpler for users to travel about the site. Because of this, it is essential to ensure that your website is compatible with various displays, which may be accomplished by making it responsive. The responsive web design approach considers an excessive number of distinct factors. Since the size of a user’s screen can vary, your store ought to be scalable based on different aspect ratios, and one of the ways to accomplish this is by using CSS media queries.
Shopify store sidebar instructions
Because your theme might not include a sidebar feature like the ones shown above, you won’t be able to find it in the theme editor as you see in those instances. This was discussed earlier.
Using a theme that already includes the option to add a sidebar to your Shopify store is, without a doubt, the simplest method available.
If you would like to preserve your layout but add a sidebar, you can accomplish this by adding to and editing the template files that come packaged with your theme. This is a complex and technical procedure.
The methods entail updating the specific template section file for the page in question, editing the existing code and adding many lines of new code, and adding Liquid code to assign sections to your sidebar so that they can be added and edited through your Shopify dashboard.
We are unable to provide any example code that would be appropriate for everyone because the code differs depending on the template that is being used and the theme that is being used.
Instead, you should become familiar with the code utilized in Shopify themes, such as HTML, CSS, and Liquid.
Conclusion
Developing the navigation of your online store is a vital stage in the process of growing your business. On the other hand, if you stick to the methods I’ve outlined above on “How to Add a Menu Item on Shopify,” adding new items to your menu will be a breeze. I do hope that it will be of some use to you. Weirdnewsera that you might not find any other platform which gives you all content about health sports business technology and entertainment.
FAQs
How do I install a Shopify footer menu?
To access the Footer content blocks, turn on the toggle next to Footer in the theme editor (Customize). To edit one of the premade Menu blocks (Shop, for example), click on its name in the Menu. The select menu is used to link a menu. Click the plus sign (+) to add more menu sections. Menu, then add a block.
How do I install a Shopify sidebar menu?
A complete index of your site’s pages can be accessed through the “Navigation” tab. Simply click the “Add Menu” button and give your new menu a name, which will be added to the sidebar. The “Add Link” button will appear after you have constructed your new sidebar menu.
Where is Shopify’s Footer Navigation menu?
Navigate to Online store > Navigation in the Shopify Dashboard. There are two default navigation bars here: the main menu and the footer menu. These menus’ links can be edited by clicking on the menu names, and new menus can be added by clicking the indigo Add menu button.
Shopify’s giant menu without the app: how?
To begin, access your Shopify admin by clicking Online Store > Themes. To make changes to a theme, navigate to it and select Actions > Edit code from the menu. Locate the Add a new snippet button in the Layout tab of the code editor. You may add a new snippet by clicking Add snippet and giving it the name mega Menu.